Why is configuring VPN from VMware Cloud on AWS to somewhere else(anywhere else!) so hard?
I tried it on my own from an SDDC from Oregon, US to an SDDC in Sydney, Australia to practice and learn myself.
Now, a few things.
VMware’s recommendation is that you always use a Route Based VPN and leverage BGP. Those topics are beyond the scope of this write up but there’s plenty you can google to read up on those topics. I’ll simply be using a Route Based VPN and BGP to demonstrate what I learned.
Also, I’m not troubleshooting any settings so this is, admittedly, a stripped down configuration. But sometimes, when you are troubleshooting, it’s best to strip a problem down to it’s most basic form and build from that point. In this way, you will know what settings are tripping you up.
So I began with two separate SDDC’s: 1 in Oregon, US and 1 in Sydney, Australia.

As you can see, both SDDC’s are single node demo SDDC’s.
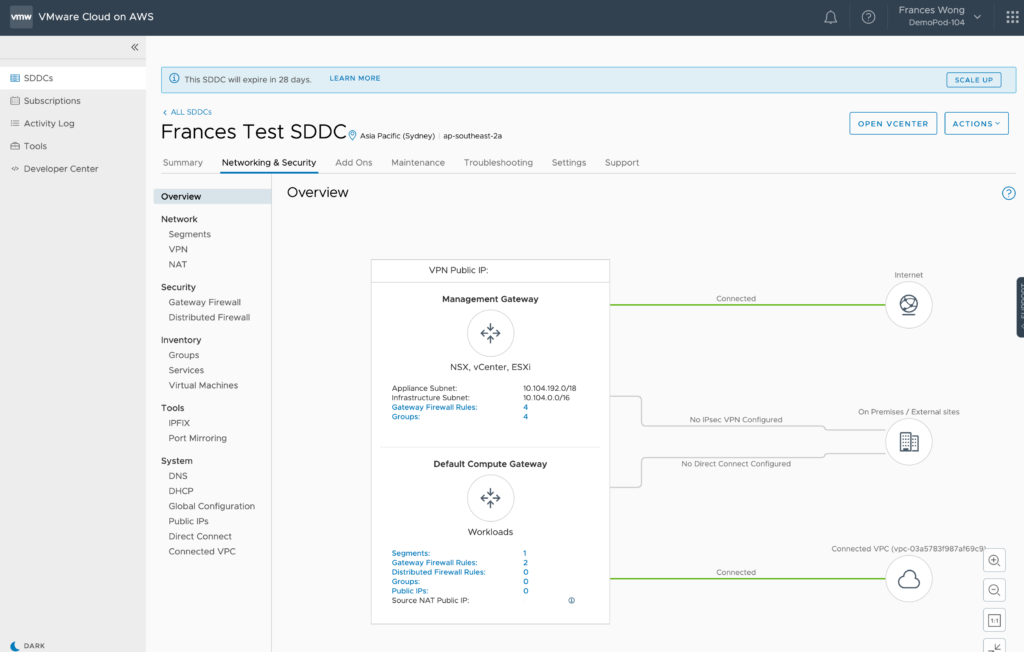
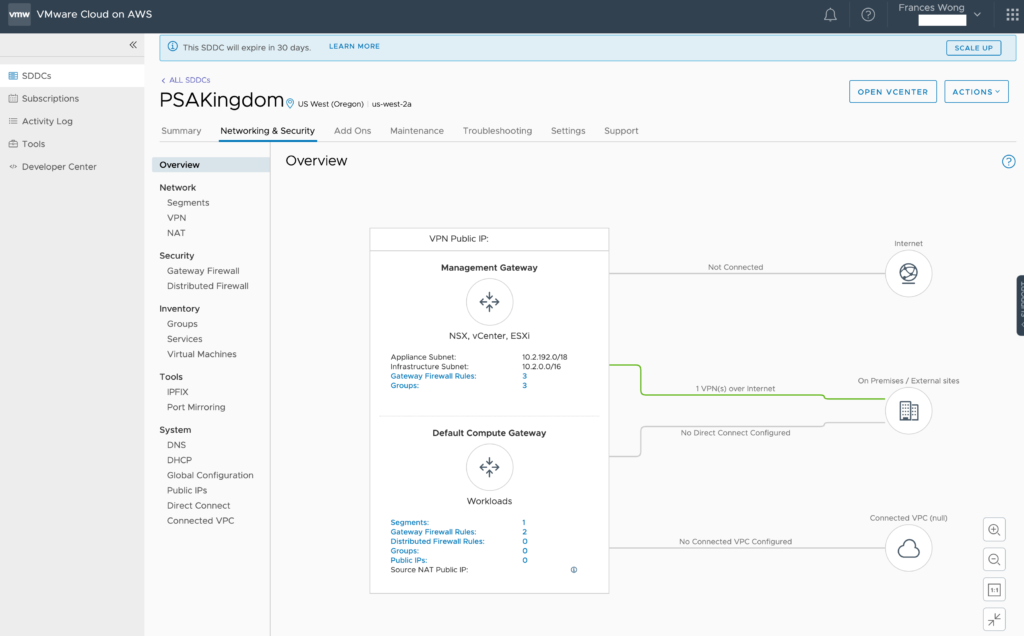
From here, you need to know the public address of your management networks. You will find that information in the Networking & Security -> Overview screen. In the diagram showing the network and above the Management Gateway, you will see VPN Public IP:
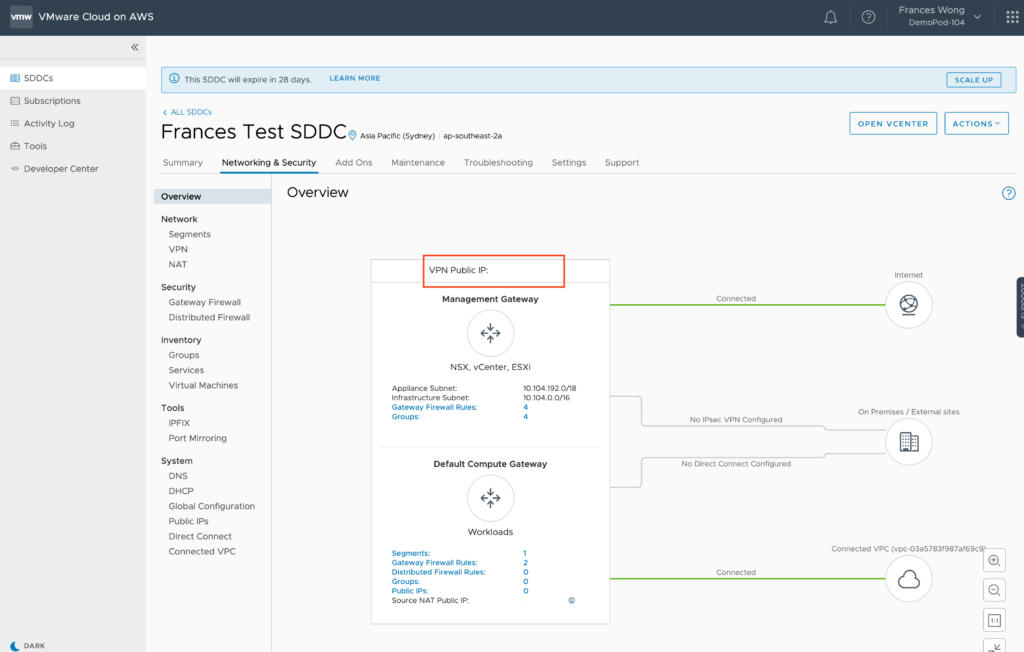
For security and privacy considerations, I’ve blanked out the actual IP that was in use.
Let’s pretend Oregon’s Public Management SDDC’s IP is 12.34.56.78 & Sydney’s Public Management SDDC’s IP is 87.65.43.21.
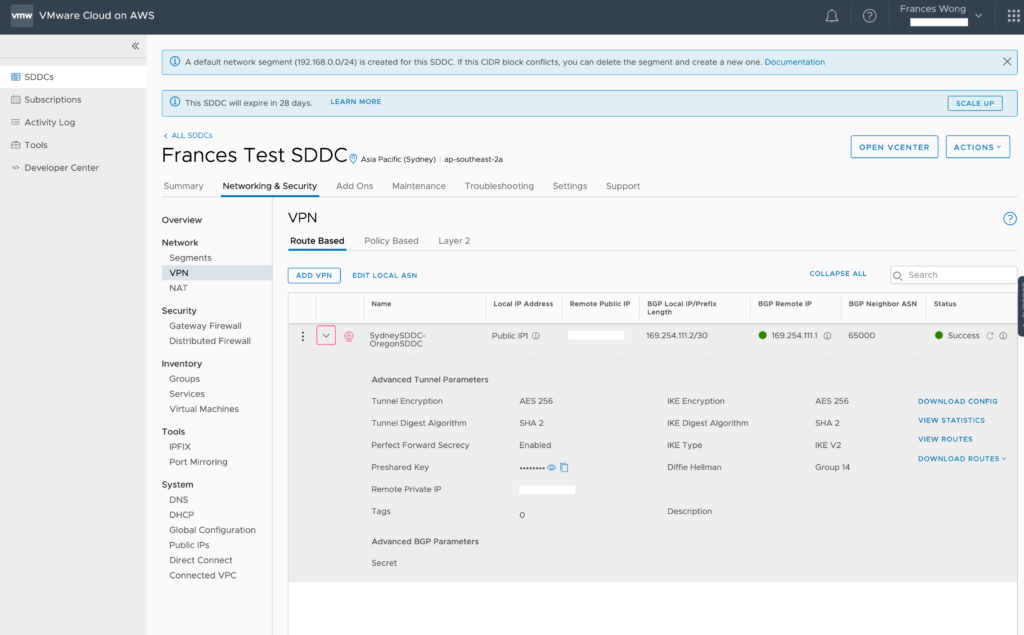
From Oregon, we navigate to Networking & Security -> Network -> VPN. Then from the Route Based interface, click on Add VPN.
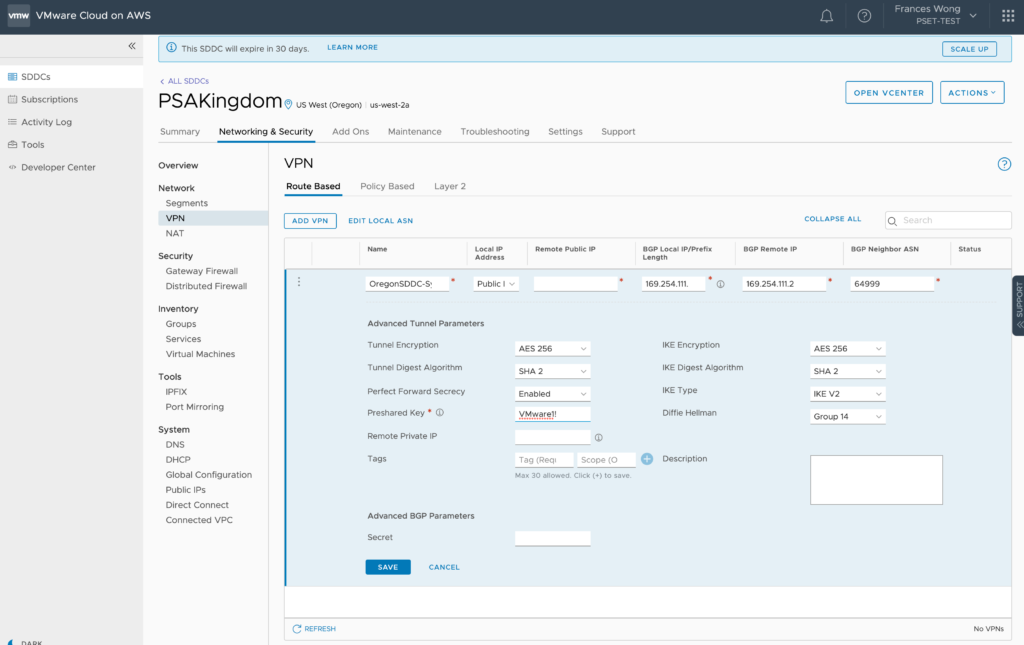
So as you all can tell, this is a very important screen. This is where all the work and thought needs to be put into. So let’s walk through this thoroughly.
- First, name your VPN connection descriptively for future generations. Here, from the Oregon location, I used “OregonSDDC-SydneySDDC” and from the Sydney location, the VPN connection is named “SydneySDDC-OregonSDDC”
- From the Local IP Address dropdown menu, you will need to select the Public address as VMC VPN’s must use the public facing IP address provided by the service.
- The Remote Public IP address is the PUBLIC MANAGEMENT IP ADDRESS OF THE OPPOSING SDDC. In this case 87.65.43.21.
- Now here’s a field that trip me up. In the BGP Local IP/Prefix Length field, there’s a little “i” icon that describes what this is.
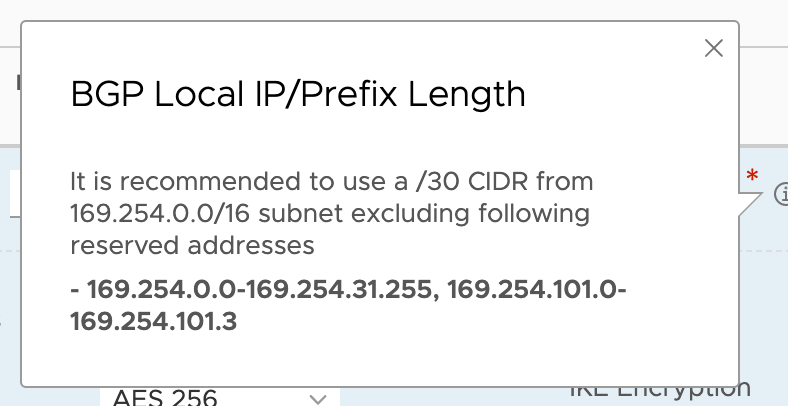
I’m sorry, but that was useless.
It didn’t tell you that you needed to decide what the opposing side was going to look like but I guess, in defense, if you know BGP, you know you’re configuring a private address space that the two VPN connections will be using to trade information(i.e. routes).
You need this link:
Detailed description of how to configure a Route-Based VPN in VMC.
Here’s the snippet you need to read carefully:
So here’s the thing.
It says use anything outside of the listed range here so I initially used 169.254.111.0/30.
.
.
.
.
.
.
Some of you know what’s wrong. I did not.
Apparently, the example they have there(169.254.111.0/30) is not a valid network IP. They talk about a network but you must use an actual IP. You must use 169.254.111.1/30.
- In the next field, you must specify another IP in the same range for the BGP Remote IP. Which means at the point of creating the first side, you must have decided what private BGP IP you will use at the opposing end of the VPN.
I used 169.254.111.2. Now remember this because you will need it when configuring the VPN from the other side.
- Next up is the BGP Neighbor ASN number. There is no lesson on BGP so you must already know that we are configuring an external BGP connection and BGP must use different Autonomous System Numbers/ASN to communicate. The default ASN number on VMC instances is 65000. Remember this also as we must configure the ASN on the opposing side. Since I know they must be different, and the field is asking for the NEIGHBOR ASN(opposing side), I decided to use 64999 since the current VPN location will use the default of 65000.
- The only other field needed in this configuration is the PreShared Key which is a text based field so use what you want.
I left all the remaining fields as default to see what would happen. Some of you may find this unrealistic but we’ll show here that the default settings do indeed work.
And I’m done so hit Save.
VMC is going to try to bring the tunnel up and initialize it but it will fail because you have not configured the opposing side.
Next up, I open up the Sydney SDDC and configure the Route Base VPN using the following:
- Name “SydneySDDC-OregonSDDC”
- Use the Public IP provided via the drop down.
- Put in the Oregon SDDC Public Management IP in Remote IP Address field.
- For BGP Local IP, remember to use the second IP address I decided on in the BGP Remote IP field. Here, I will use 169.254.111.2/30.
- For the Remote BGP IP, I will use the IP I assigned to the Oregon Location: 169.254.111.1.
- You do not modify the ASN number here. We will do that after we are done with the VPN Configuration.
- Enter the same PreShared Key as Oregon
And you’re done! Hit Save.
VMC will try to bring up the VPN. Provided the settings mirror each other, the VPN will come up green but the BGP portion will error out since we are using the same ASN numbers over external BGP.
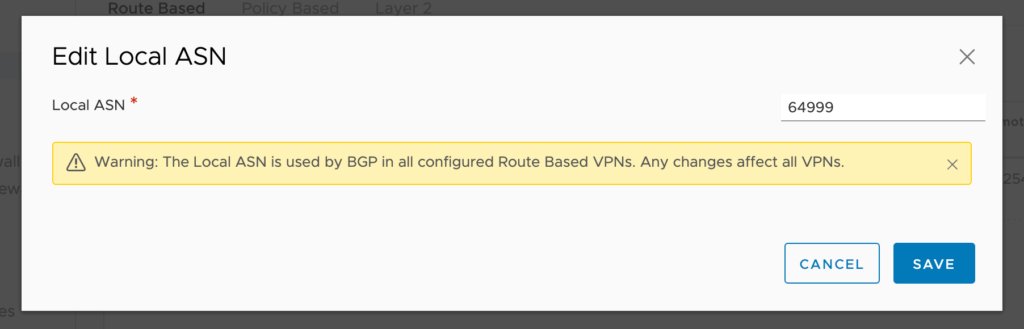
Right next to the Add VPN option there is an Edit Local ASN number. When you click on it, it will allow you to change the ASN and you must do that. Here, I’ve selected 64999 which is what I decided on when I configured the Oregon side of the VPN.
When you hit Save, it will warn you that the ASN number affects all VPN’s associated with this SDDC. Hit ok and the change is complete.
Now we go back to the VPN line item and hit the “i” next to BGP Remote IP in both SDDC’s and select Initialize. They may show errors at this point. Once they are initialized and if they are configured properly, the remote IP’s will go green.
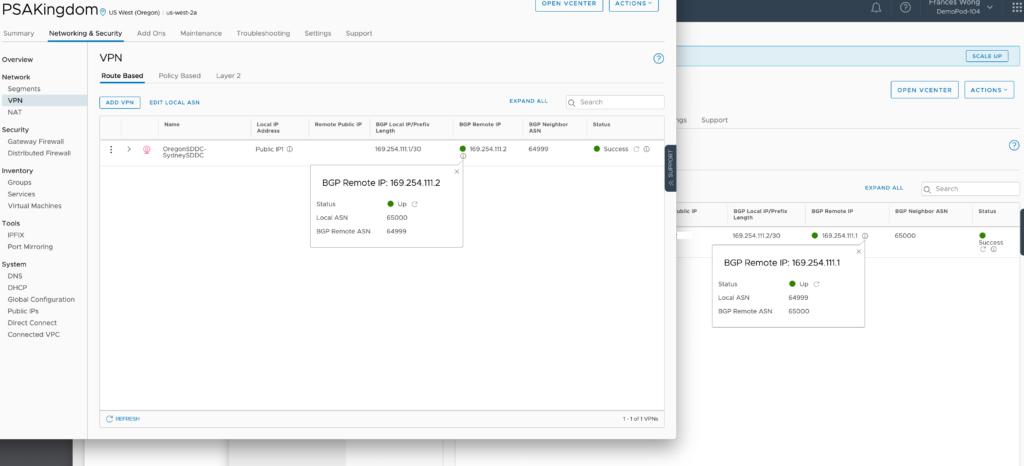
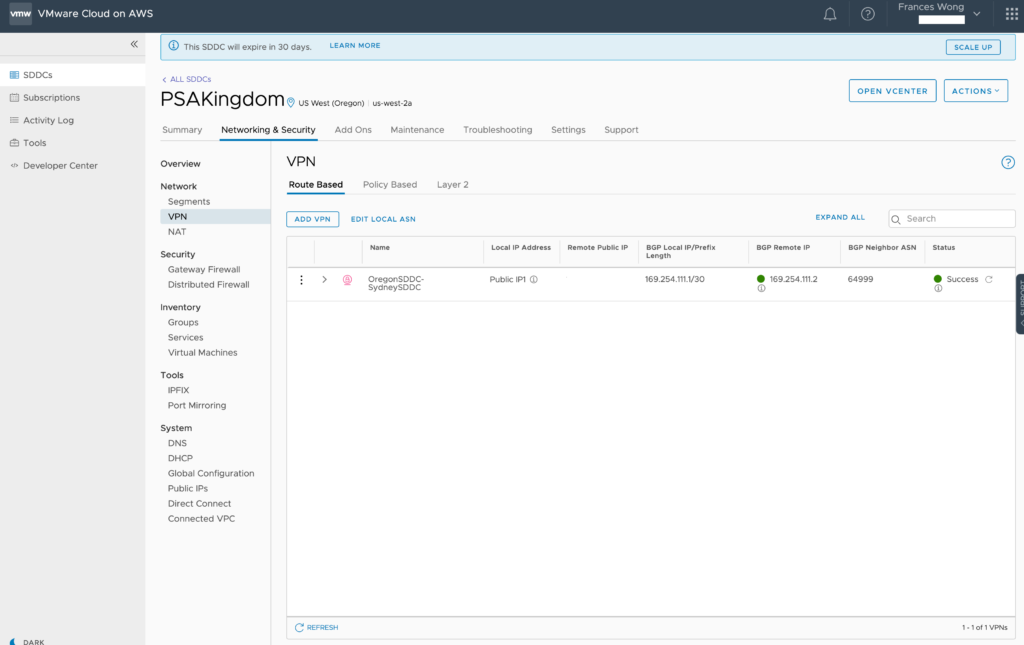
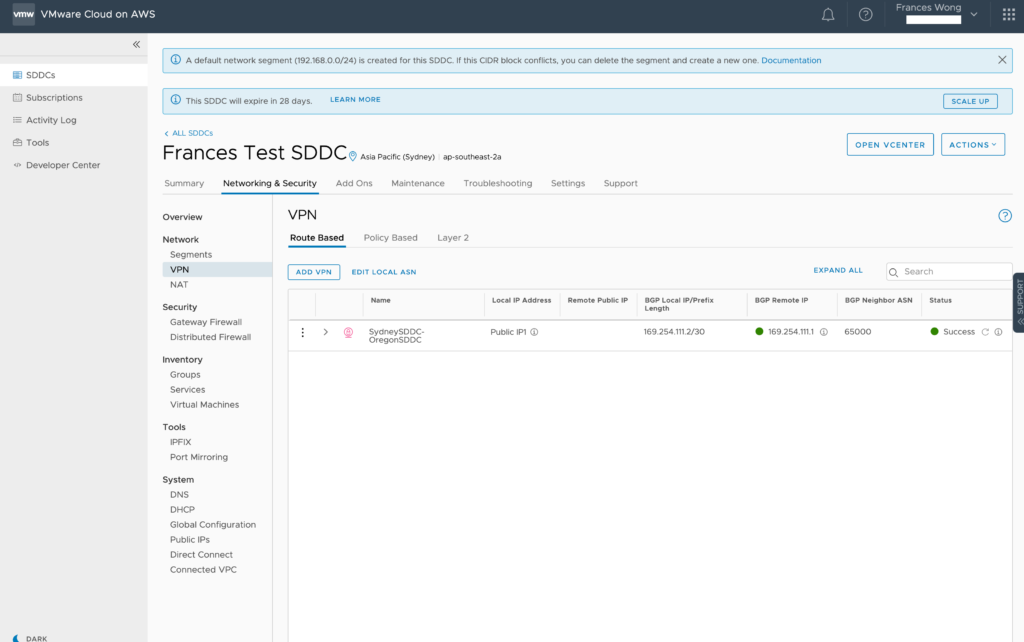
Both VPN’s should come up green.
Here’s Oregon:
Here’s Sydney:
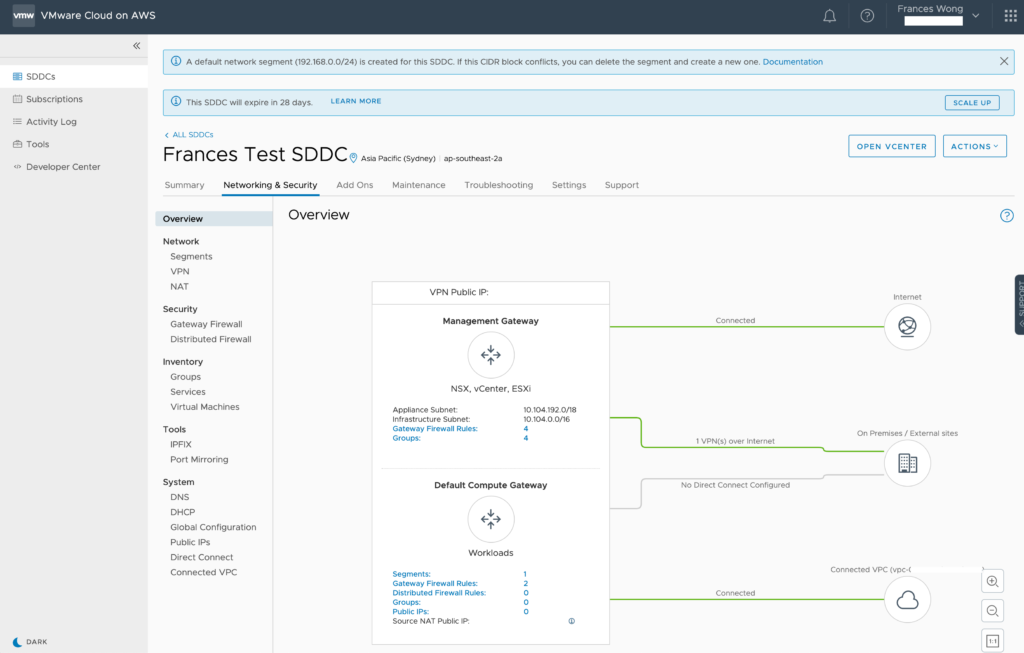
The Network Overviews should show an active VPN connection in the green from both sides.
Here’s Oregon:
Here’s Sydney:
Can you believe it? It worked.
Remember, I NEVER modified the options inside the VPN configurations. No changing Diffie Hellmen Group numbers, no change in IKE settings.
So what I learned in setting things up are:
- There’s a lot about BGP that you need to be aware of if you’re going to do it. I tried to explain some of it here but arm yourself and read up on BGP so it doesn’t take you off guard and make you question your configuration.
- You don’t NEED to modify settings in VMC for VPN to work. What you really need to know is which of those settings are available for you to configure on the other end of the VPN tunnel.
- Someone once told me that networking is not that hard but it is detail oriented. They also said the key to networking is symmetry. I could not agree more. CHECK YOUR SYMMETRY if it’s not working. Notice the IP’s, private BGP network, ASN numbers at both ends of a tunnel. They should mirror each other.
This may have a been an overly simplified configuration but it’s a configuration that WORKS. If my 20 years of IT experience taught me anything, it’s to start from a functional place and build on it. The business is not going to care which private addressing scheme you WANT to use, but they will care that it WORKS. Don’t try to win the battle (of what it should be) but lose the war(of getting the job done).
Good Luck!